By Bernt Hildre
Little known facts about the break cord, military vs BASE static line jumps and ‘loading speed’.
Did you know…
that the mil spec break cord was not specified to be a break cord?
that military static line jumps use the break cord as a packing aid, not for extracting the parachute?
that the only reason your break cord holds is due to pack job deformation?
that with a strong exit push the force on the break cord is less than when falling straight down?
If any of these were surprising, keep on reading.
Mil spec break cord: not a break cord
Mil spec break cord is commonly used in static line BASE jumping. More precisely it is type I ¼” tape (woven cotton) with its production and properties specified in the MIL-T-5661 document.
Its minimum breaking strength is specified to be 80 lbs, but there is no upper limit specified, which is a bit strange if it was intended to be used as a break cord. However, the production and material are well specified, so the maximum strength that could be achieved is probably given by this, and may be known and may be not of concern. However, it is not mentioned explicitly.
According to the spec the intended use is for:
“woven cotton reinforcing textile tape and webbing intended for use in the manufacture of aeronautical equipment” (from chapter 1.1 Scope)
”The Type I tape and webbing are suitable for reinforcing tape on cloth under lacing cords of airfoil sections.” (from chapter 6.1 Intended use)
Nowhere in the spec is it mentioned that this tape is intended for use as a break cord.
That does not mean it is not suitable for military or BASE static line jumps. Repurposing existing solutions is smart, but it is repurposed.
As a side note, there is considerable variation in break cord strength depending on how moist the break cord is. If it has very low humidity, it weakens. If it is wet, it is stronger, read more here https://www.watchthybridle.com/2015/10/breakcord
Military vs BASE: apples and oranges
Military static line jumps are D-bag jumps, where the MIL-T-5661 Type I ¼” tape seems to be used but it is not used for pulling out the chute, it is not part of the parachute extraction chain. It is used for closing the T10 container (and in a couple other places in the pack job). Quite a significant difference from static line BASE jumps. This means that premature breakage of the break cord does not lead to lower opening altitude, instead it would result in the D-bag falling out of the container. Quite a difference.
Military static line jump system has additional shock absorption. The cable in the airplane that the static line is hooked up to gives, it stretches, when it is loaded, acting as a dampener, a shock absorber.
Let’s have a look at some videos to see the above items in action.
Here’s a video of packing the T10, enjoy the music:
If you don’t like the music, skip to 06:50 and 08:10 to see how the break cord is used.
Here’s a video showing a slow-motion close-up of the parachute extraction including at what stages the break cords break. Here they have used one more break cord compared to the previous video. I hope you liked the music in the previous video…
Here’s a video of military static line jumping seen from inside the plane, showing the shock absorption that the anchor wire provides. The video should start playing at 03:35.
So in military static line jumps, the attachment wire provides the shock absorption, in addition to possibly some compression/deformation of the parachute inside the D-bag, and the break cord is NOT a part of the parachute extraction chain, therefor premature breakage of the break cord does not mean lower opening altitude.
In static line BASE jumps, the deformation of the pack job provides essentially all the shock absorption, unless external shock absorption is added (e.g. Apex static line bridle, bungee cord, anchor rope etc.). The break cord IS a part of the parachute extraction chain, and premature breakage of the break cord DOES result in lower opening altitude.
Which brings us to…
No pack job deformation, break cord fails every time
Let’s start exploring the importance of the deformation of the pack job as its fall is stopped, by doing a drop-test replacing the parachute with a chunk of metal. When I say ‘SL’ below, I mean the thing that is attached to the anchor point and your bridle with the break cord in between.
My parachute weighs 4.5 kg. When I attach 4.5kg of metal at the parachute-end of my bridle with the SL attached at 1.5m from bottom pin, the highest fall the break cord can hold is somewhere between 40 and 60 cm. At 40 cm it holds, at 60 cm it fails.
So with this setup, a solid mass can fall about half a meter and the break cord holds, while on a real static line BASE jump the break cord can stop the same weight after almost 3 meter fall, with a typical static line setup. This is what the deformation of the pack job does, in fact it is the only reason the break cord holds. The pack job deformation seems to mainly consist of straightening out the S-folds and depending on how you pack, possibly also pulling out the center cell. This results in that the energy of the falling parachute is gradually transferred onto the break cord, not all at once, and the peak force is kept below the strength of the break cord. This also means that if your pack job is more rigid than normal, the break cord will experience higher load force.
You can feel this transfer of energy from the falling parachute when you give a PCA. Your fist gripping the bridle never stays perfectly still as the bridle gets tension and stops the parachute falling. The less you allow your fist to be pulled downwards, the more force your bicep must generate. If you allow your fist to move more, you can use less force.
As a thought experiment, if you for any reason would want to do a static line BASE jump with skydiving gear, with the chute packed in a bag, you would remove much of the shock absorption, and risk of premature breakage would increase, given all other variables remain unchanged.
So from a physics point of view there is nothing static about a static line BASE jump. Perhaps anchored extraction jump would be more descriptive, but I’ll stick to calling it a static line jump.
Horizontal exit speed is a good thing
Some time ago I saw a video of a guy doing a running exit on a static line BASE jump and the break cord broke too soon. Luckily there was just enough height. This got me wondering how a running exit, or in general horizontal exit speed, would affect the parachute’s loading speed on the break cord. By loading speed, I mean the component of the parachute’s velocity that is aligned with the static line setup when the static line setup is being loaded, denoted as vL in the diagram below.
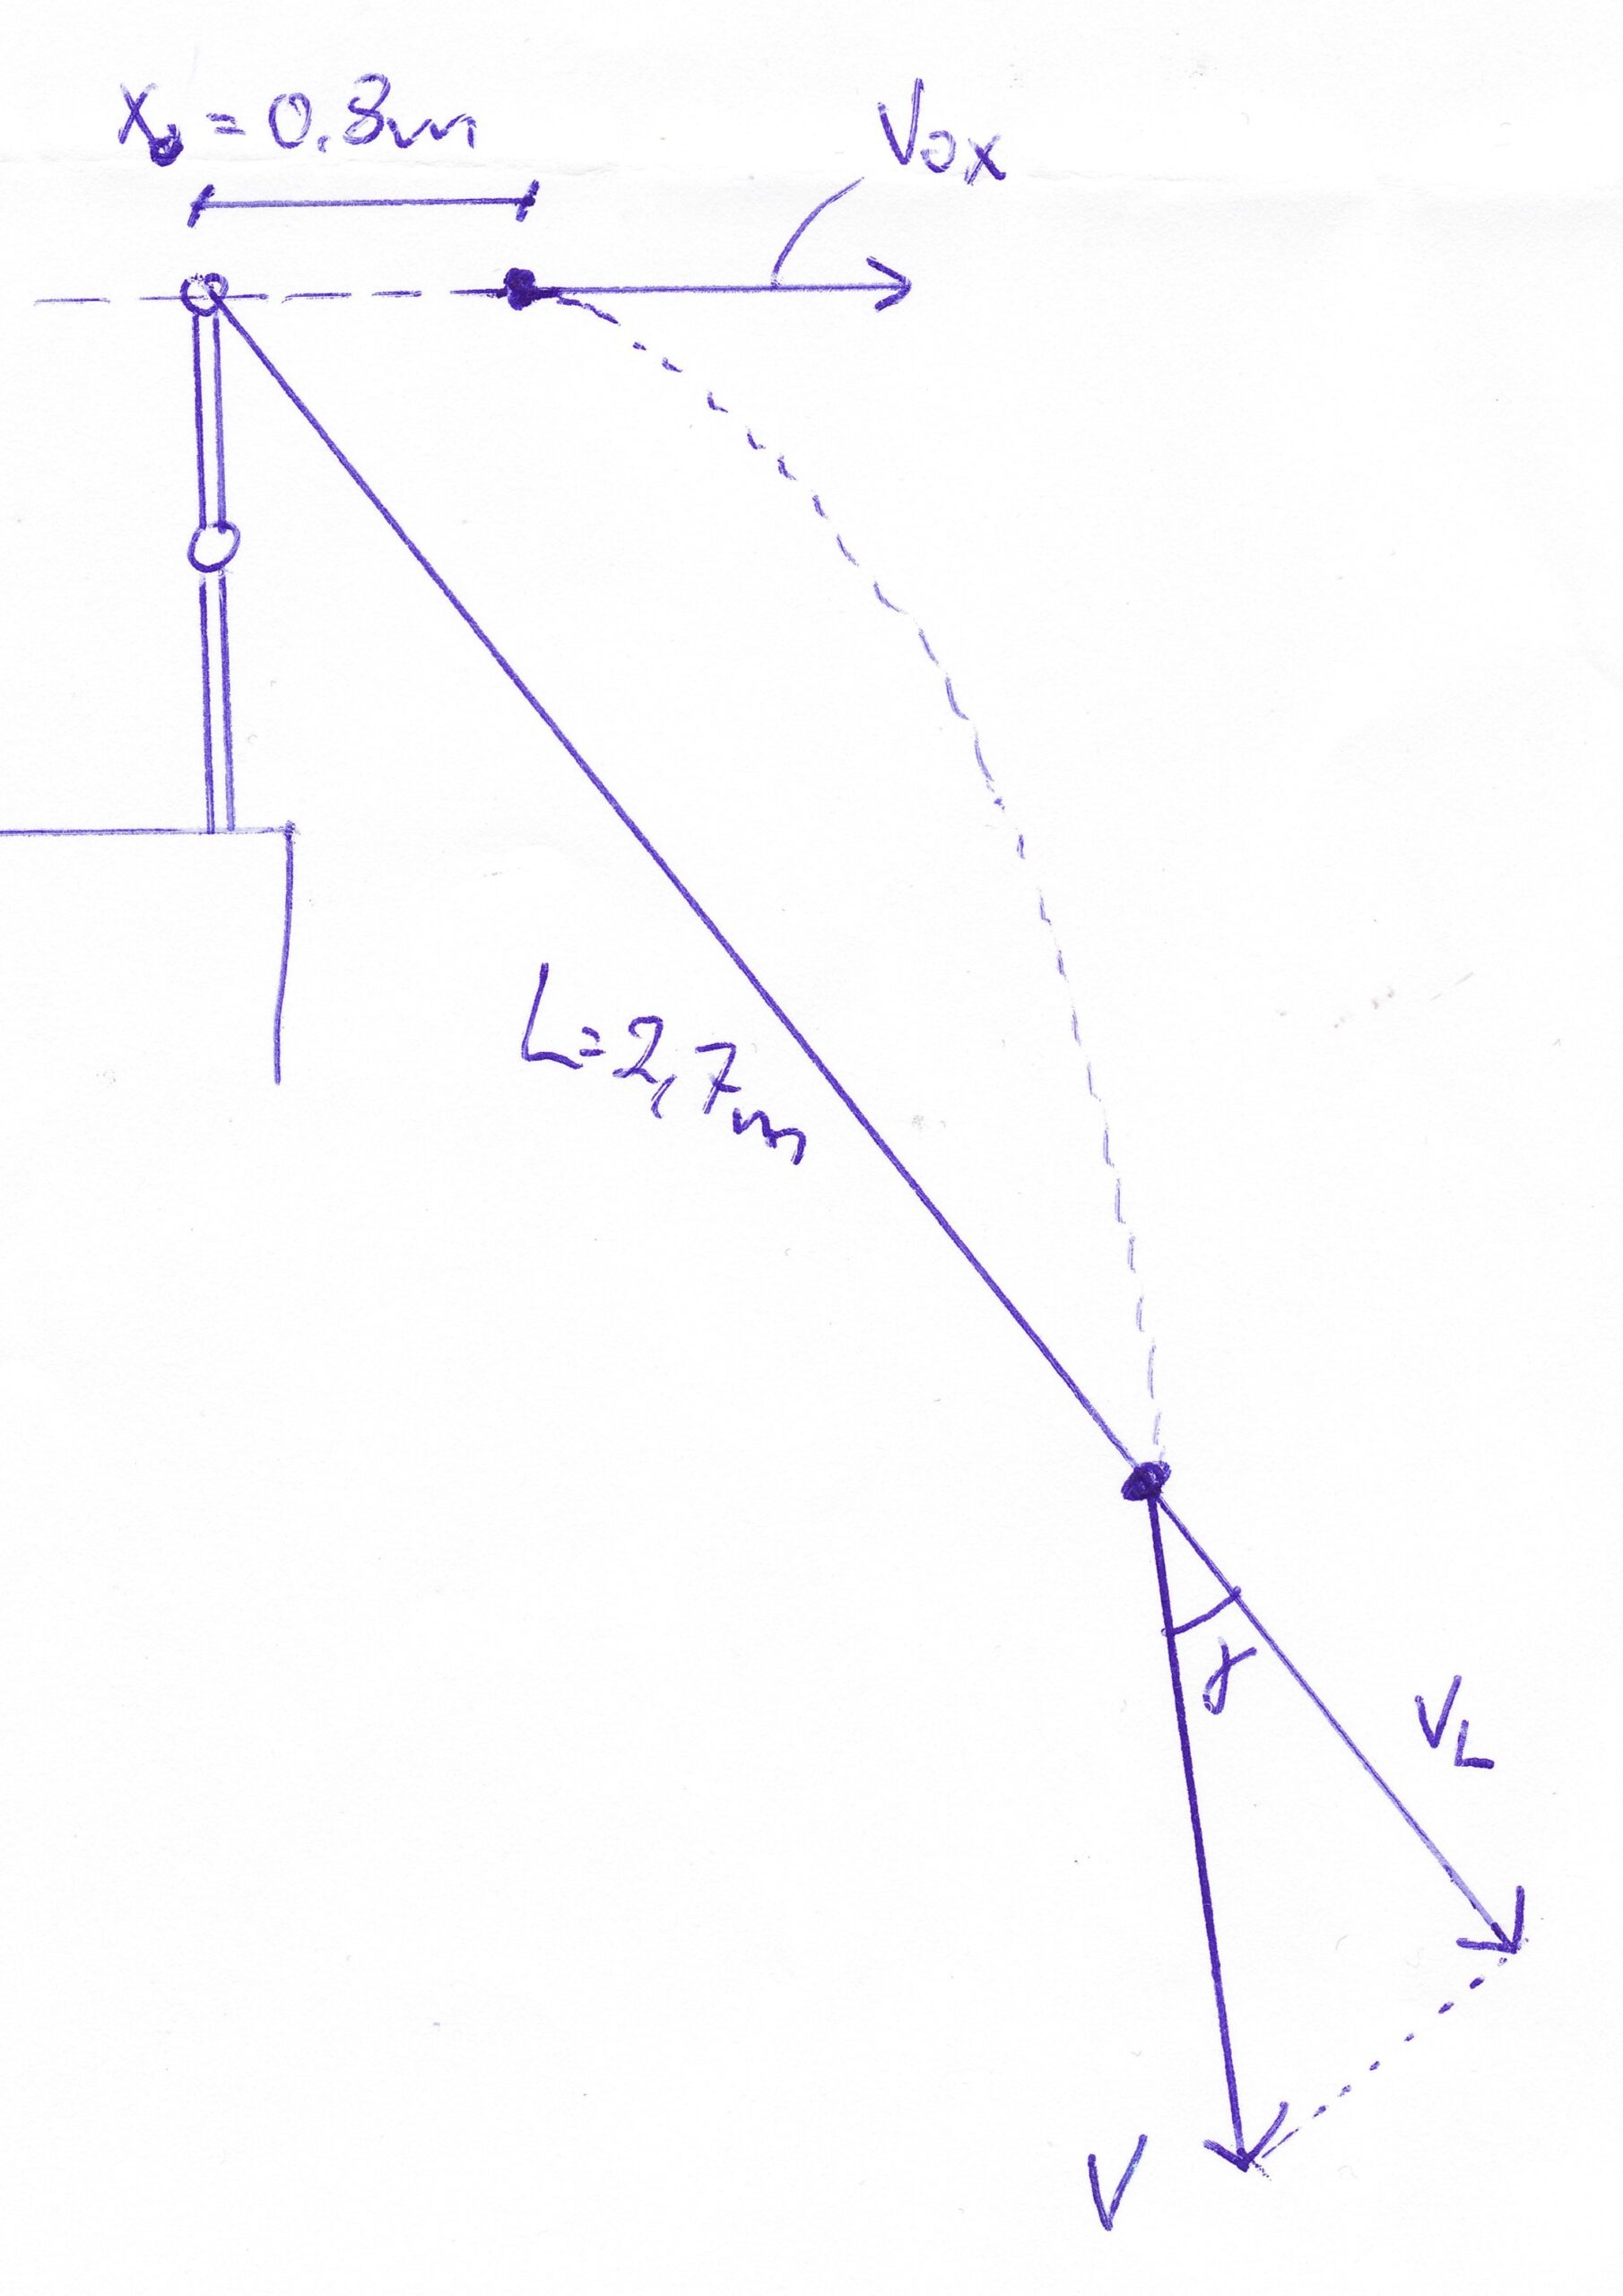
Additionally v is the vector speed of the falling parachute and v0x is the horizontal exit speed. Note that vL is always smaller than or equal to v. The SL is in this article anchored at x = 0, y = 0.
The loading speed is much easier to calculate than the actual force on the break cord since there are so many variables coming into play if attempting to calculate the force on the break cord. The loading speed is a measure that will translate into force on the break cord, and is the same for all setups, therefore it is a good proxy and is sufficient to show the effects of horizontal exit speed. The loading speed is also the basis for calculating the relative loading energy, as we’ll see a bit later.
So I did some calculations. Let’s first take a closer look at the assumptions and then the implications of these calculations.
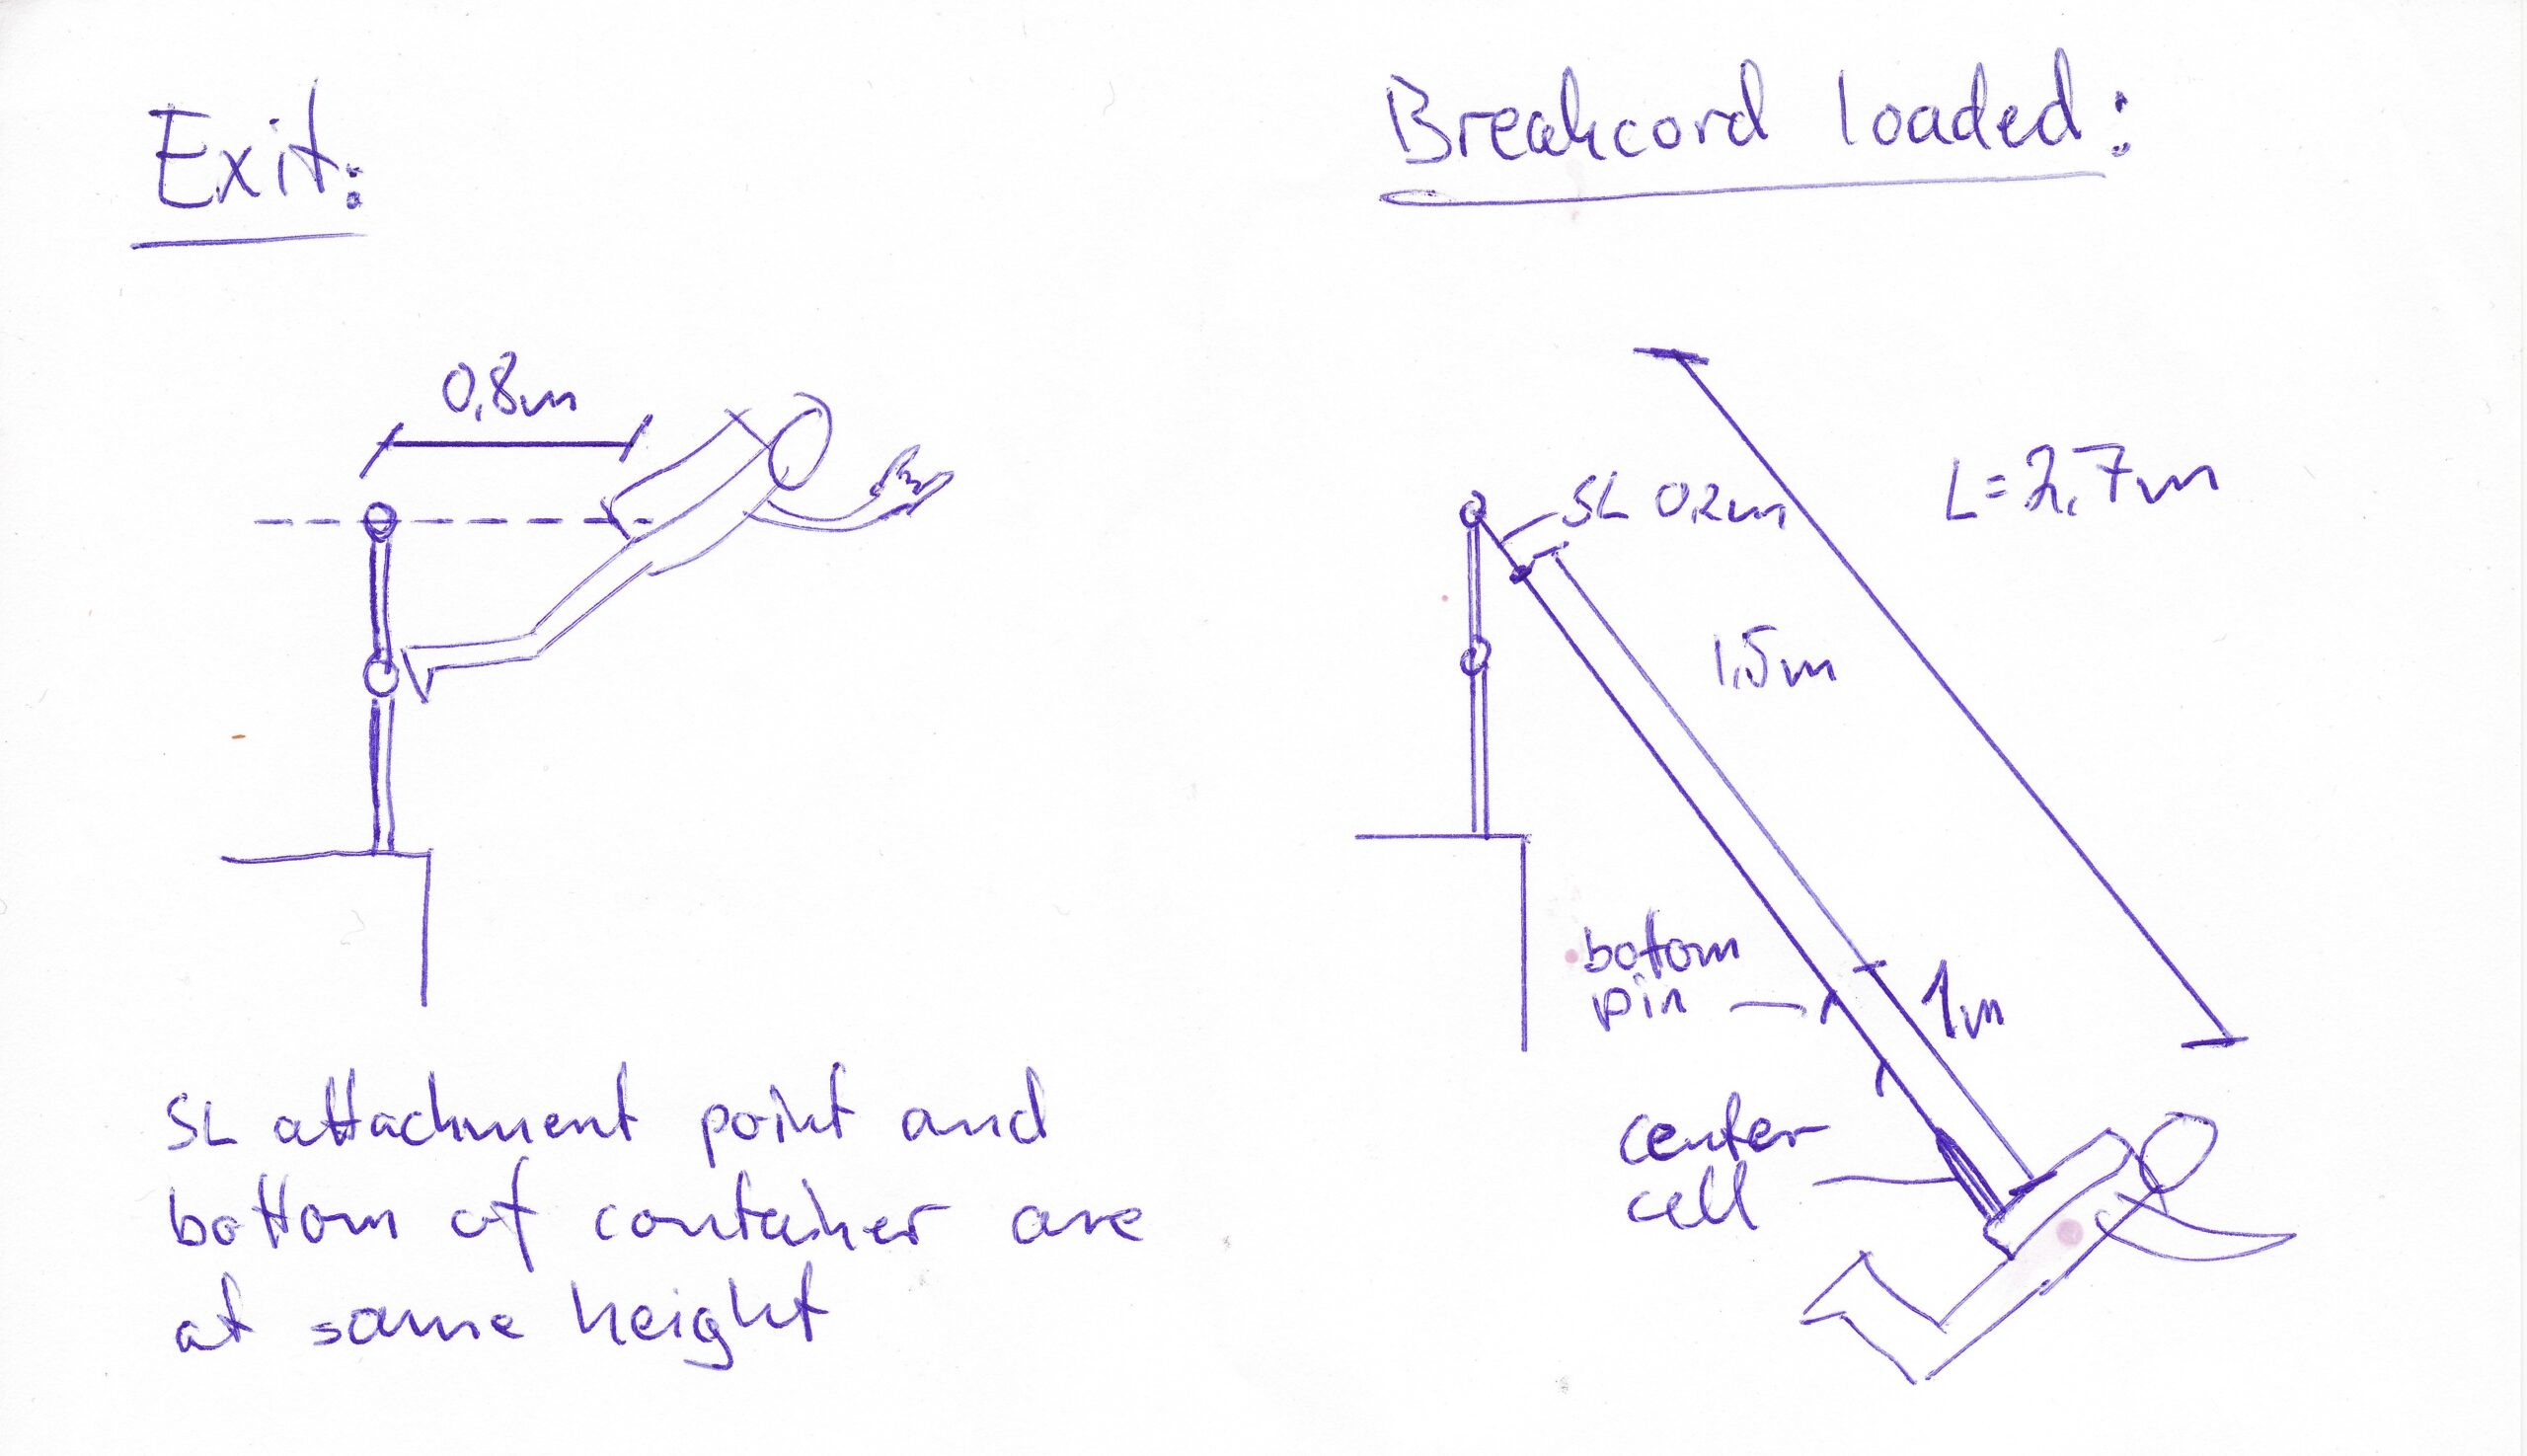
The scenario is jumping from a railing where the bottom of the container is at the same height as the SL anchor point at exit, with the SL attached to the bridle at the midpoint measured from the bottom pin, resulting in L = 2.7 m since also including the slack in the center cell, see diagrams below. Let’s call this the ‘Hand Rail’ scenario.
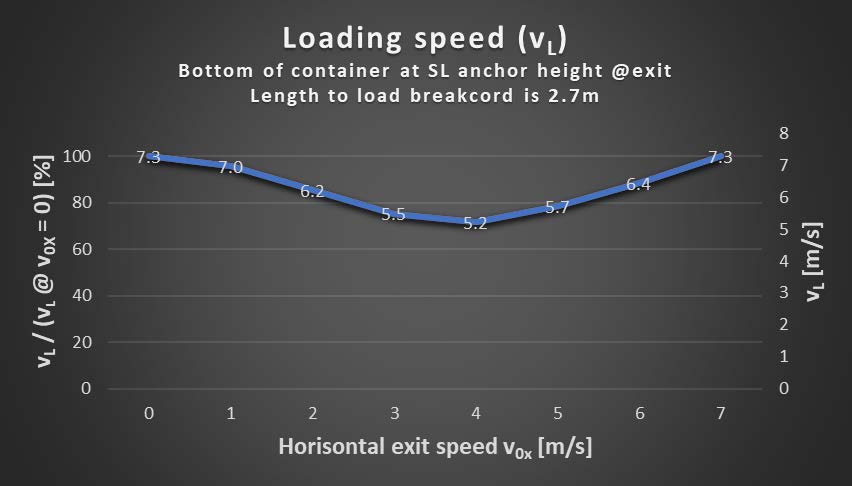
In the plot below we can see that pushing off with a horizontal exit speed of 4 m/s is optimal for minimising the loading speed and thereby also the force on the break cord and that the falling parachute’s loading speed is about 30% less at this horizontal exit speed, compared to dropping straight down.
It would require rather athletic legs to be able to achieve a horizontal exit speed that would result in a higher parachute loading speed than when falling straight down in this setup. I’ve used GPS data to estimate my max horizontal exit speed from a standing exit with legs side by side on SD BOC jumps to be approx 4 m/s.
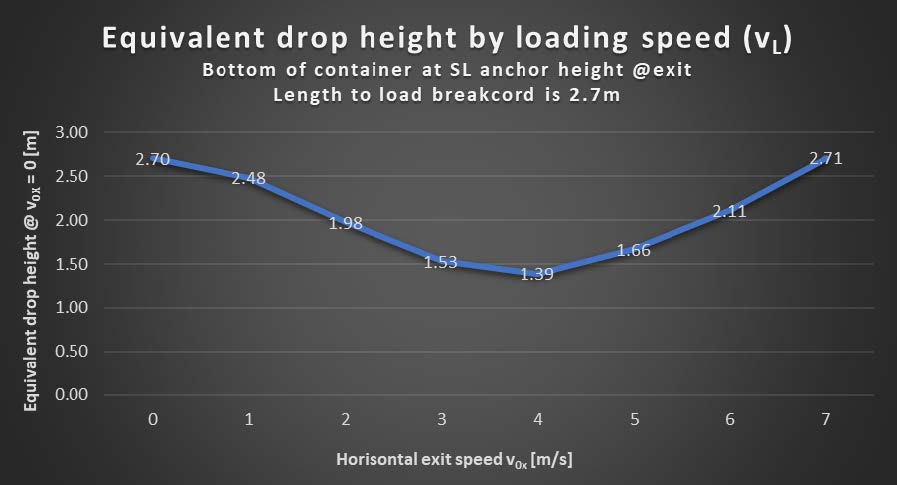
And same as above but shown as equivalent drop height, e.g. if you push off with 4 m/s, the equivalent drop if you fell straight down (no forward speed) would be 1.39 m, i.e. as if you had attached your SL only 0.19m from the bottom pin.
You can probably feel this when giving a PCA, given you grab the bridle at the same distance from the bottom pin each time. When your buddy is pushing off hard, the strain on your bicep should be less.
The above plots give a feeling of the effect of a strong push, but the really interesting measure is the loading energy EL of the falling parachute, i.e. the energy the falling parachute has resulting from the loading speed vL. Then we can compare the relative loading energies for various scenarios and see what exit speed gives the lowest loading energy. In addition to the ‘Hand Rail’ scenario above, let’s next have a look at the following scenarios:
- ‘Running Cliff’ (i.e. running of a cliff with the anchor rope hanging just over the edge)
- ‘Standing Cliff’(i.e. a stillstand exit with the anchor rope hanging just over the edge)
- ‘Overhead Rail’(i.e. with the anchor at head height)
and compare the loading energies of these to the ‘Hand Rail’ scenario.
In order to compare the loading energies for these scenarios, all we need is to square the loading speeds and calculate the ratios of these. We don’t need the mass since that cancels out.
The reference point for all the values shown in the plots below is the ‘Hand Rail’ scenario at horizontal exit speed v0x = 0, i.e. the leftmost 100 % value on the dark blue line. The y0 is the vertical position of the bottom of the container at exit, relative to the vertical position of the anchor point, so y0 = 1m means the bottom of the container is 1m above the anchor point at y = 0.
As the anchor point is shifted downwards below the jumper, it is intuitive that if you would fall off straight down, the loading energy would increase. But it is somewhat surprising that running off a cliff at 4 m/s gives less relative loading energy than pushing off with the same speed in the ‘Hand Rail’ scenario, as seen in the plot below.
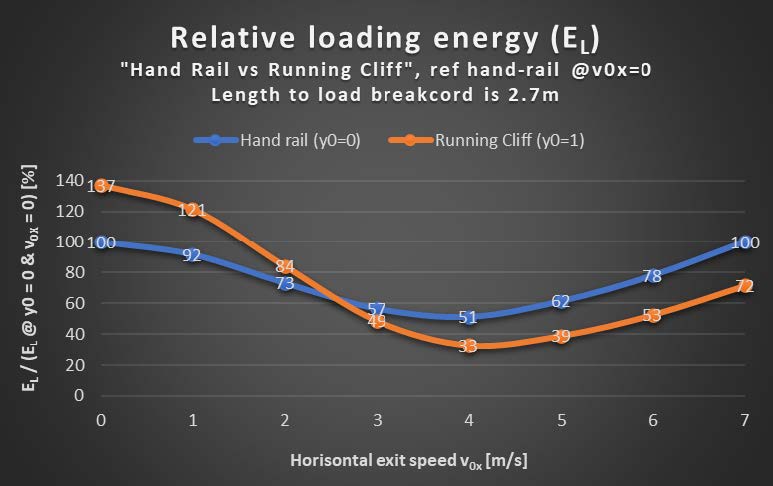
This means that it was probably not the running off the exit that caused the break cord to break too soon for the guy I mentioned at the beginning of this section, assuming that his setup works in the ‘Hand Rail’ scenario.
On a standstill exit from a cliff, you would probably lean more forward in the push and therefore bring the bottom of the container closer vertically to the anchor point at exit, therefore the y0 is a little less here compared to the ‘Running Cliff’ scenario. Still we’re seeing similar results here.

We have an object nearby where you tie off at head-height and do a standstill exit, so the bottom of the container will be quite a bit below the anchor point in this ‘Overhead Rail’ scenario, therefore y0 = -1.1m.
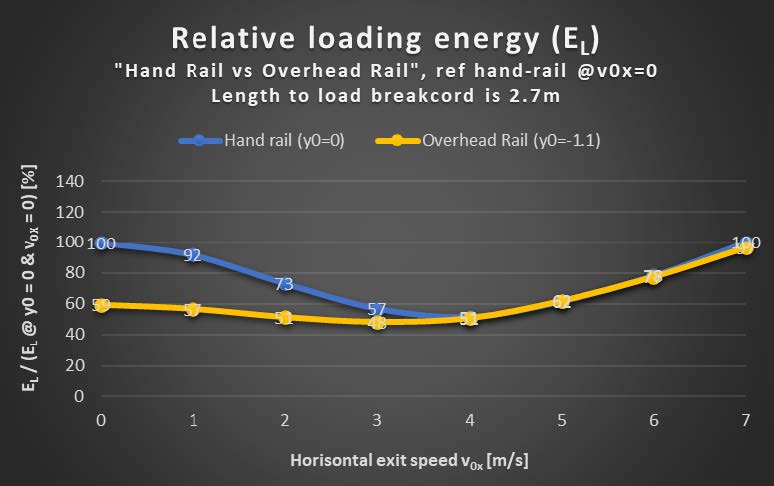
It is quite interesting to notice that the optimal horizontal exit speed for all the above scenarios is about 4 m/s. Who would have thought? At least that was not intuitive to me. And also quite interesting that you’d need olympic legs to be able to push off with a horizontal speed, in all above scenarios, that would be worse than falling straight down in the ‘Hand Rail’ scenario.
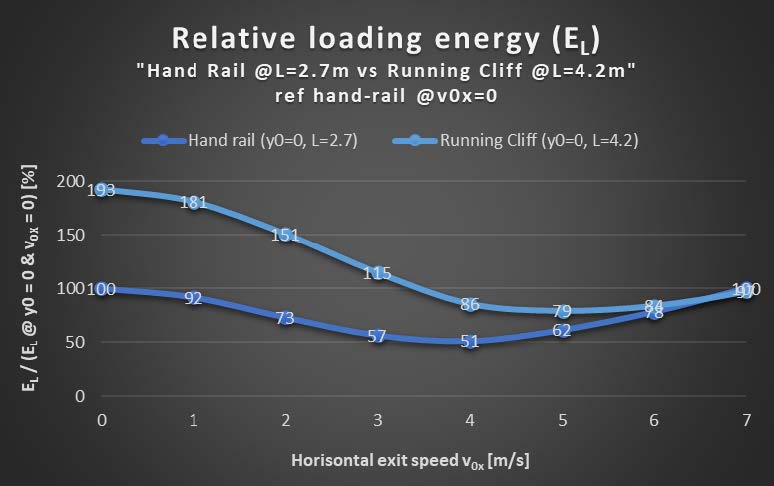
As a bonus comparison, let’s compare the ‘Hand Rail’ scenario above (L=2.7m, i.e. attaching the SL at the middle of the bridle) with the ‘Running Cliff’ scenario where we instead attach the SL at the end of the bridle (L=4.2m). It’s interesting to notice here that as the speed increases to about 7 m/s, the loading energy is the same in these two scenarios, and also the same as in the ‘Hand Rail’ with 0 horizontal speed.
Hang loose or call me?
In the world of hand signs there is a fine line between hang loose and call me. Similarly, how far down or up on the bridle you attach the SL thingy can determine whether you do a static line jump or get a chicken-freefall-assist. Have you ever tested how far up the bridle you can go before you start taking free fall? If you don’t know this, you don’t know your margin. You could be 50 cm, 20 cm or maybe 10 cm from a prematurely failing break cord under certain conditions. If you haven’t tested, you don’t know.
This can be tested at a free-fallable object, where you gradually shift the SL attachment point on your bridle towards the pilot chute, until it starts to fail prematurely.
From the scenarios above, the worst case is stepping off a cliff with minimal horizontal speed and with a short non-stretchy anchor rope slightly over the edge. Cliffs are not very practical for testing unless the cliff is very overhung, but a free-fallable crane boom or bridge is. If tying off at foot level and stepping off with minimal speed, and you experiment with how far up the bridle you can attach the SL thingy to find your margin to premature breakage, you are pretty well set up to avoid premature breakage with any horizontal exit speed that normal human legs can produce in the scenarios described above.
Make sure you have good bridle control when doing this testing so it does not get entangled with your legs.
Then, when it matters, make sure you tie your SL way below this point on the bridle, below as in direction of the bottom pin.
Practical implications
The following happened to a friend of mine.
Say that you normally exit with a strong push. You’ve never tested how far up the bridle you can attach your SL and still have the break cord do its job, i.e. you don’t know how close you are to a premature breakage. Then let’s say you jump from under a bridge where there is an obstacle in front of you and you cannot push, but must fall straight down. This will lead to a higher loading speed of the parachute as we’ve seen in the scenarios above, which translates to higher force on the break cord. If you have attached your SL close to the premature failure point on your bridle, then this additional force could be enough to result in premature breakage. Which it did for my friend. Luckily he had enough altitude.
The essence here is adding margin to avoid the break cord breaking too soon. As we’ve seen above, we can do this in 3 ways:
- Find the premature failure attachment point. The further you can attach your SL on the bridle from this point, the more margin you have.
- Don’t only rely on the deformation of the pack job for shock absorption, add something stretchy in the extraction chain, e.g. Apex static line bridle, a bungee cord, or other stretchy things. I’ve used cling film on my static line jumps instead of the break cord, but that is a different story.
- Push out hard on exit if you can.
I hope you found this interesting and learned something new. I sure learned a lot while researching and writing this article.
If you made it this far and would like to discuss, you can reach me at bernt.staticline@proton.me.
Appendix: Loading speed calculation details
In this section I lay out the diagrams, formulas and assumptions used to calculate the loading speed.
The base data set for the calculations are a set of x0 and v0x pairs, i.e. how far out horizontally you are when gravity starts doing its thing and what horizontal speed you have at that moment. I have used these pairs for all scenarios:

y0 tells how far the bottom of the container is above or below the SL anchor point. Setting this value defines the various scenarios in these calculations.
SL = the thing that is attached to the anchor point and your bridle with the break cord in between.
vL = loading speed, the component of the parachute’s velocity that is aligned with the static line setup (SL, break cord, bridle) when the static line setup is being loaded.
Below is a description of the ‘Hand Rail’ scenario and consideration used for calculating vL.The same calculations are used on all scenarios by changing y0 accordingly. I’ve used 0.2 m for the SL, 1.5 m from SL attachment point on bridle to bottom pin, and 1 m for the rest of the bridle including the length of the top part of the center cell, since this needs to be lifted before starting to load the break cord. This gives a total length of 2.7 m in a straight line between anchor point and parachute, before the break cord is loaded.
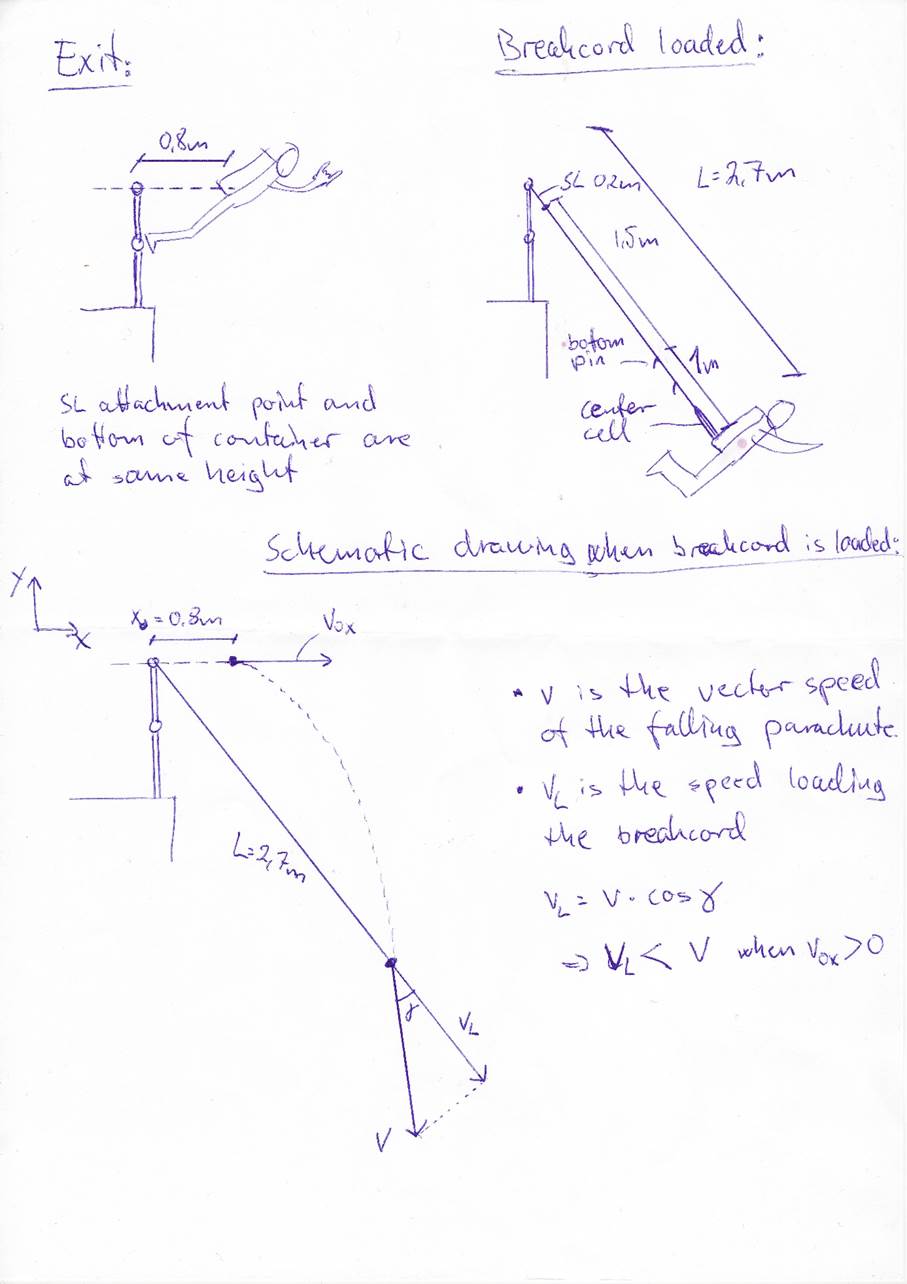
Below is a schematic view of the scenario and formulas used.
Can you spot the condition where one of the formulas below does not work anymore? It’s corrected in the excel doing the calculations.
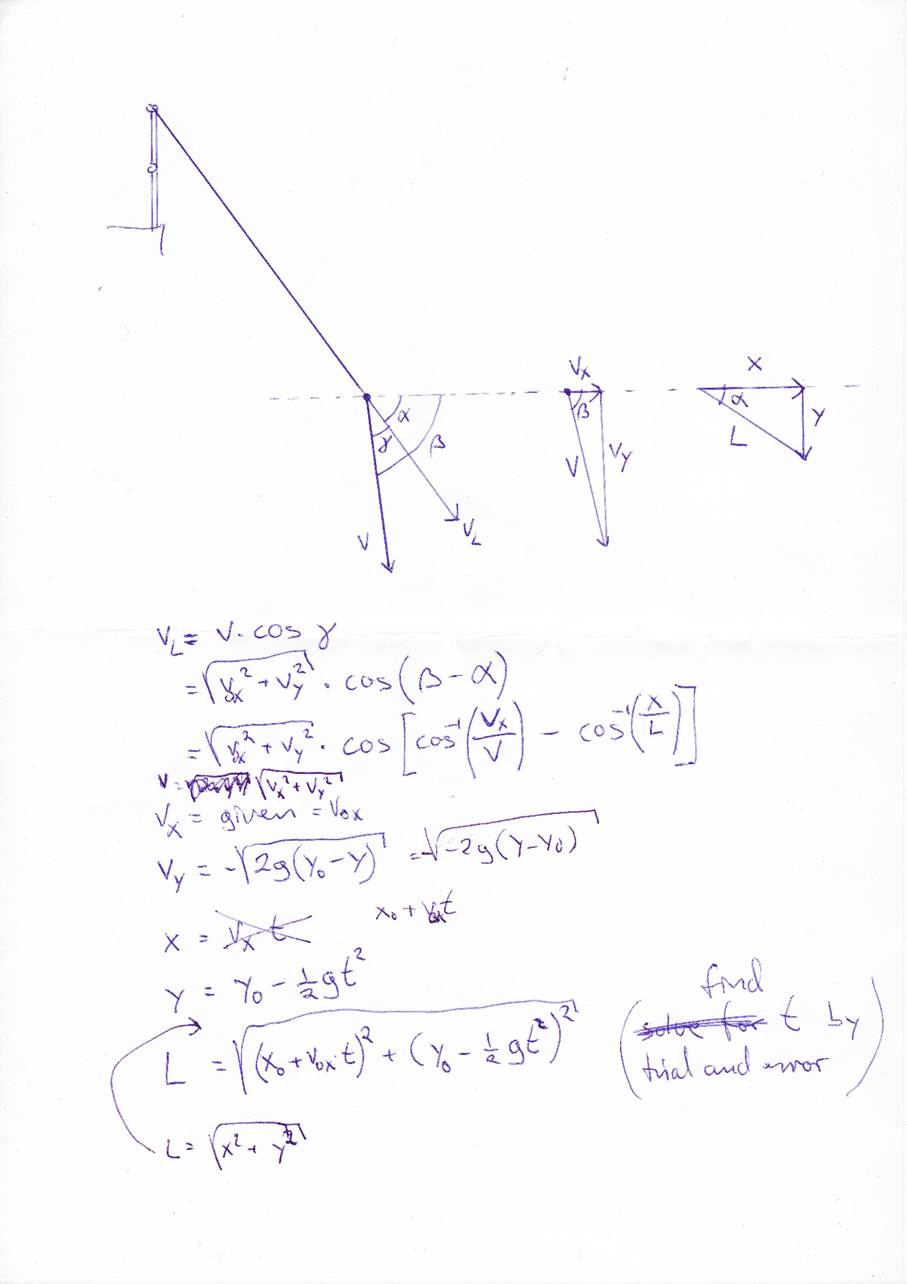
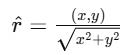
Or a simpler approach is to use the vector dot product if you are familiar with that, between the vector v and the unit vector r along the static line setup:
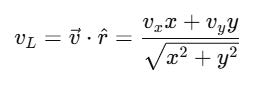
The excel used for these calculations is available on demand.
About me
I’m a Norwegian BASE jumper living in Finland since 2000, I’m married and have two daughters. I started skydiving in Norway in 1998 and began BASE jumping in 2003, with my first jump from Karlskråtind in Romsdalen, Norway. I do up to 30-40 jumps per year.
In 2004, at jump number five, I did my first static line BASE jump. With an M.Sc. in electrical engineering and a good understanding of physics, I realised that the only shock absorption in a static line setup comes from pack job deformation. The logical consequence of this realisation was to increase the shock absorption in order to decrease the risk of the break cord breaking too soon. I ended up using cling film as the fuse instead of traditional break cord, since this stretches before it breaks. After extensive drop testing and freefallable-object experiments to gain trust in the setup, this became my standard static line setup.
Using cling film instead of break cord led to some push-back from other BASE jumpers, which led me to question the accepted truths and look more closely into the mil spec break cord, military static line jumping and eventually calculating the impact of horizontal exit speed. After sharing my findings with anyone who would listen, I realised this may be worth sharing with a wider audience and eventually put this article together.